| When
Steve Simmons first asked me to write an article describing my photographic
process, I wasted no time and jumped at the opportunity knowing that most
photographers would be extremely reluctant to discuss their technique
in fear that it can be easily copied. The experienced (read: secure) photographer
knows that given the same materials, each artist's unique vision is interpreted
and recorded on film differently.
This
article documents the "birth of a collaboration." In it I
will share my process; from inspiration & research, pre-visualization,
casting models, my studio set-up and clearing Polaroid T55 p/n film,
to ultimately printing and toning my images. I am an artist that does
not belabor photo-technical issues: The most simple and direct method
to obtain the image is always the best method by far. The
result is the culmination of over three years work and research, supported
by interviews with anthropologists and historians of Greek antiquity
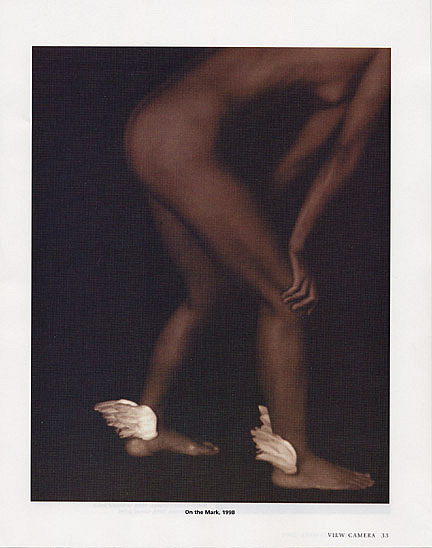
and the ancient Olympic games. The subject matter of The Altis is both
classical and contemporary; its inspiration being loosely based on these
ancient games. The term 'Altis' comes from the Greek name for the actual
sacred olive grove where the original Olympic games took place. The
games were a religious rite performed in the nude and women were banned
from attending-refusing to comply was a crime punishable by death. The
intent was not to academically replicate the ancient games, but rather
to present a unique and contemporary document of an aesthetic and highly
stylized world, glorifying women and athletics. I hope to pave the way
for a classical revival of the nude by empowering the female spirit
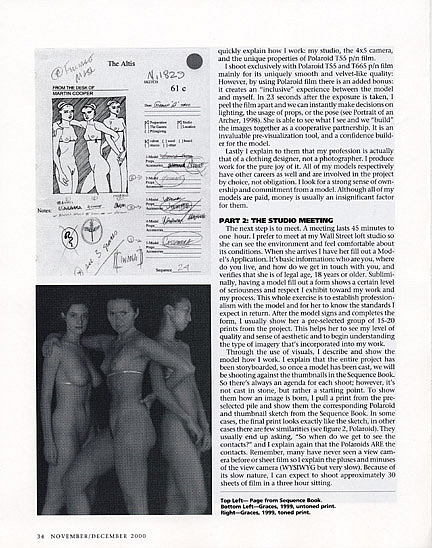
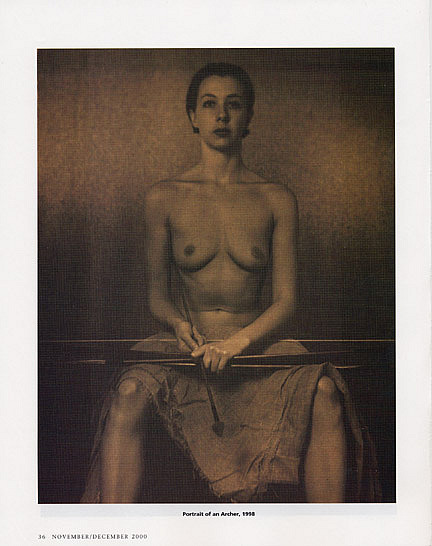
through strength and beauty. I shoot exclusively with Polaroid T55 and T665 p/n film mainly for its uniquely smooth and velvet like quality; however by using Polaroid film there is an added bonus: it creates an "inclusive" experience between the model and myself. In 23 seconds after the exposure is taken, I peel the film apart and we can instantly make decisions on lighting, the usage of props, or the pose (see Portrait of an Archer,1998). She is able to see what I see and we "build" the images together as a cooperative partnership. It is an invaluable pre-visualization tool, and a confidence builder for the model. Lastly
I explain to them that my profession is actually that of a clothing
designer, not a photographer. I produce work for the pure joy of it.
All of my models respectively have other careers as well and are involved
in the project by choice, not obligation. I look for a strong sense
of ownership and commitment from a model. Although all of my models
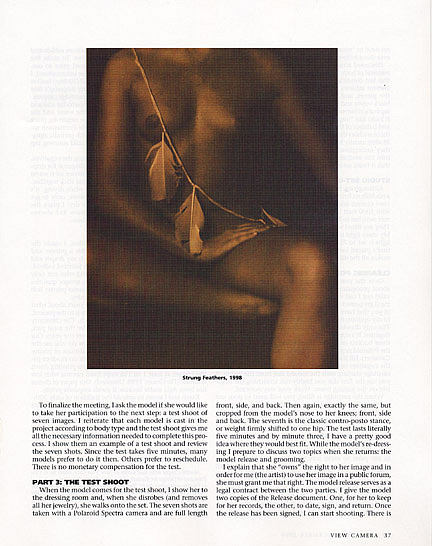
are paid, money is usually an insignificant factor for them. Through the use of visuals, I describe and show the model how I work. I explain that the entire project has been storyboarded, so once a model has been cast, we will be shooting against the thumbnails in the Sequence Book. So there's always an agenda for each shoot; however, it's not cast in stone, but rather a starting point. To show them how an image is born, I pull a print from the pre-selected pile and show them the corresponding Polaroid & thumbnail sketch from the Sequence Book. In some cases, the final print looks exactly like the sketch, in other cases there are few similarities (see fig.2, Polaroid). They usually end up asking, "so when do we get to see the contacts?" and I explain again that the Polaroids ARE the contacts. Remember, many have never seen a view camera before or sheet film so I explain the pluses and minuses of the view camera (WYSIWYG but very slow). Because of its slow nature, I can expect to shoot approx. 30 sheets of film in a 3 hour sitting. To finalize the meeting, I ask the model if she would like to take her participation to the next step: a test shoot of 7 images. I reiterate that each model is cast in the project according to body type and the test shoot gives me all the necessary information needed to complete this process. I show them an example of a test shoot and review the 7 shots. Since the test takes 5 minutes, many models prefer to do it then. Others prefer to reschedule. There is no monetary compensation for the test. Part
3: The Test Shoot For the release, I explain that she "owns" the right to her image and in order for me (the artist) to use her image in a public forum, she must grant me that right. The Model Release serves as a legal contract between the 2 parties. I give the model 2 copies of the Release document. 1 for her to keep for her records, the other to date, sign and return. Once the release has been signed, you can start shooting and there is no need to "renew" the release for other sessions. I never, ever shoot without a signed release on file, even if they are friends. Discussed
after the test are hairstyle, make up, and the removal of body hair
(if needed). There are 2 reasons for this last condition. 1) it is historically
accurate that the ancient athletes removed body hair before competing
at the games and 2) most of my images are shot against black velvet
and monochromatic film does not record any separation between the black
backdrop and the pubic area. It looks like "negative space"
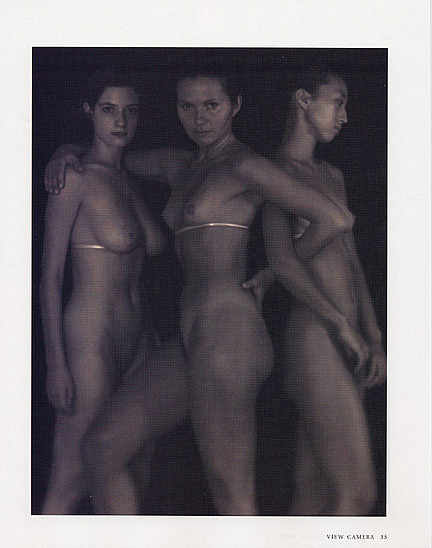
and disturbs the proportions and balance of the figure. Just seeing
the reflection of skin there anchors the figure on the page (see The
Graces, 1999). Models usually have no problem with this condition since
they understand its historical reference and how it fits into the aesthetic
and visual language of The Altis, and that it bears no reference to
sexuality. I make my final decision on a model within a week or two. When the cartridge is filled, you will need to pour out the reddish-purple liquid produced from the processing gel. Do this only when you're ready to start clearing the negatives. After you pour out the purple liquid, flush the negatives with regular cold tap water for 20 minutes. I place a flat marble ashtray on top of the cartridge so it can't flip around in the bucket while the water's running. When it's done, I pull each negative out and hand rinse it in my palm to make sure there's no more jelly on the negative by feel. Just make sure you remove your rings first! The buckets usually come with a pack of sodium sulfide powder to make the clearing solution. The solution needs sodium sulfide to eat the remaining processing jelly off the negative. The powder never worked for me. Instead, I use Permawash by Heico. First, Permawash is a liquid, not a powder & dissolves into water instantly. Powder will not. Secondly, Permawash contains sodium sulfide and a hardening agent to protect the negative. To make the solution (Please note: solutions should all be prepared prior to use. Refer to Permawash directions for further info.), I place an empty cartridge in a Rubbermaid (10 liter) bucket and fill it with enough water to cover my fingertip's 1st knuckle of while it's resting on top of the cartridge (approx. 7 liters). Remove the empty cartridge and add approx. 4 oz. of Permawash to the water and stir thoroughly. Now, after palm washing the negatives, place the negative cartridge into your pre-made Permawash solution for approx. 5 minutes with periodic agitation. After 5 minutes, rinse again in cold running tap water for another 20 minutes. Lastly
you will need to Photoflo and hang the negatives. Make sure you clip
your negatives on a diagonal for dripping. In the winter months (when
the interior air is warm and dry) the negatives can curl inward and
stick together. Never leave your negatives unattended while drying.
It's not worth having done so much hard work, and get ruined negatives
at the very end. Once dry, I place the negatives in Light Impressions'
Transview 4x5 sleeves (#5313) and catalogue them in my database. We have shared many ideas over the years about what we love from the past and how we can translate them into the present but with a thoroughly modern approach. The chemistry of yesterday is fairly similar to today's for the most part, but it is the papers that have changed over the years. Our printing and toning challenge was, "how do you use the same chemistry to achieve a velvety platinum or photogravure-like quality, and make it all work on modern papers, in silver. I first worked with Bob on printing down the images at least 1 to 1-1/2 stops from normal with low contrast (see fig.4, The Graces, 1999. untoned). Our paper of choice has been Agfa matte because it yields exquisite prints. Karen and I aspire to uphold the tradition of early 20th century photographic masters by hand toning each print to achieve a particular richness and depth. Karen's unique tones are 'alchemically' mixed from scratch, using bespoke recipes based on early 20th century formulas. The work of Stieglitz, Steichen, or the patina of Maillol's bronze figurines inspires the coloration of my prints (see fig.5, The Graces, 1999. toned). Once finished, each print is signed, stamped, dated, numbered, and titled (see fig. 6, stampings). |